
Let’s say your WordPress site works at “olddomain.com” or “olddomain.com/blog” or something like that, and you want to change it to “newdomain.com” or “newdomain.com/blog” for example. These steps explain how to make that switch. We recommend viewing the video below or reading through the steps before you attempt the changes so you know what is involved.
Changing Domain Names for WordPressCaveats before you begin…
There may be social media sites (like Facebook, Twitter, etc.) which interact with your site, and changing your site’s address will disrupt any ties to your old URL address, for example:
- Facebook ‘Like’ counters
- Facebook Comments
- Tweet counters
- other social media integrations
Sorry, this is just how social media sites tie together with websites, so it’s a good idea to change your site address only if necessary. New likes, shares, comments, etc will show up after you’re done with these steps below, but old counts and comments may not be displayed.
Changing the primary domain name associated with your blog
- You need to purchase your new domain name. You can usually do this right through your existing hosting company.Additionally, if your domain name is registered at a separate company from your hosting service, you may need to point your new domain to your hosting nameservers after your new address is created. Work with your registrar or hosting company tech support if you need help with this step.You need to add this domain name onto your hosting account as a “parked domain” or an “add-on domain”. This terminology may vary from company to company, but here is how it works with most web hosts:
“parked domain” (recommended) – This option will point your new domain (e.g., “newdomain.com”) at the same web space as your primary domain (e.g., olddomain.com”). After setting up this way, you should be able to view your ProPhoto site by going to both the old and new addresses.”add-on domain” – This option will point your new domain into a specific folder on your server, separate from your current site. After setting up this way, you should see a default landing page for your hosting service when visiting the new address. (use this option if you plan to use ProPhoto at the new domain, and using the old domain for something else. - Wait for your new domain name to begin to work. Most new domain names work within a few hours, but it is typical that new domains don’t work until about a day has passed. 48 hours is about the maximum time you should wait before you contact your hosting company or registrar for help.
- After waiting, test your new domain name by trying to visit it in your browser. Remember to fill in with ‘blog’ at the end, if your WordPress setup was located at an address like http://www.olddomain.com/blog/ so that you fill in the new address the same way, such as http://www.newdomain.com/blog/DO NOT PROCEED TO THE NEXT STEP until you can confirm that visiting your new address shows you your WordPress site. If you change the URL in WordPress before the new address works, you’ll be locked out of WordPress and you’ll need help resetting things.
- You’re really sure that you can view your WordPress site using the new domain address? Okay, we’ve warned you! Login to WordPress using the old address and go to “Settings” > “General”. Update the domain name portion of both URL address boxes here with your new domain name. If your old address included anything after the domain, such as “/blog/” or something like that, you must leave it in the new address. If you need to move WordPress so the plain address is used instead, you’ll have a separate guide to follow later, showing you how to move WordPress into the root folder on your server. When you change the URL address in these boxes, you’ll see a red warning message from ProPhoto, and you can ignore the message since you’re obviously using this tutorial 🙂
Scroll to the bottom and click “Save Changes” and you will be logged out of WordPress, and sent to the login screen for your site using the new address.
If you setup a parked domain, your site officially “lives” at your new domain name and should work properly when viewed/navigated from the new address. But you’re not done yet – it’s time to setup a redirect so don’t stop here!
A “wildcard” 301 redirect is recommended because it will send any previous link from your old domain to the equivalent address at your new domain. For example “olddomain.com/category/weddings/mary-and-joseph” would be redirected to “newdomain.com/category/weddings/mary-and-joseph” which is probably what your visitor wanted to view
If you see an option to forward with masking, DO NOT use it – masking can goof up WordPress and ProPhoto. Use forward only if your host gives you the option. Since redirects are managed in your web hosting account, so you can contact your web host customer support for help setting this up.
A few optional cleanup steps:
- Update URLs pasted in WordPress – you may have pasted addresses into WordPress manually, which is no big deal if you keep your old domain live and have a 301 Redirect setup. But fixing old links is recommended. Check out:
- ProPhoto menu items – most link types will update automatically, but if you pasted links in manually as custom links, you will want to fix the domain name in the link.
- Custom Grid items – check your link URLs in ProPhoto, here:
“ProPhoto > Settings > Grids > Custom Grid Items” - Widgets – check for links you’ve pasted in graphics widgets and text widgets in all your templates in “ProPhoto > Customizer > Layout”.
- Links in pages/posts – WordPress plugins can help you update links on your site, but we recommend making a backup of your WordPress database before trying anything like this. Another approach is to manually edit pages and posts which have links to your site content pasted in manually.
- Update Feedburner – you may have setup Feedburner service for your site’s feed. Simply login to the Feedburner site and edit the original feed address and that should be all you need to do.
- Update Google Analytics – you may have setup Google Analytics to track traffic on your site. Login to your Analytics account and go to your Admin area where you can edit your property settings and update the URL of your site, and that should be all you need to do.
- Update Google Search Console – you may have setup Google Search Console to review the operation of your site and your search ranking details. Login to your account and click the gear icon to choose Change of Address from the dropdown.
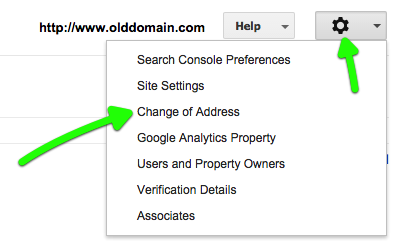
Follow the steps in the guide to complete the process.


