Google and other search engines are trying to make the Internet better by using a website’s security as a ranking signal. This means that websites which work from a secure https:// address may receive a slight boost in search result ranking.
Since WordPress can operate from only one URL address at a time, there are a few steps involved in getting a site working with a secure https address. You can try the steps below on your own if you’d like. Or, if you’d prefer someone else do it all for you, NetCrafted is a great resource that provides this service.
Step 1: Get a secure certificate for your site
An SSL certificate is sort of like a driver’s license – it verifies the identity of a website so your web browser can trust the data sent to/from the website. SSL certificates go deeper than this analogy with fancy words like encryption and stuff, but you should know that we are unable to grant SSL certificates for your website.
We suggest that you contact your hosting provider for help with this step. Many hosts now offer a free SSL certificate for your website through a simple button click in your account, so check with your host if you need guidance getting an SSL certificate for your website and to understand your options.
Step 2: Make sure your site can be viewed via HTTPS
After getting a security certificate for your domain name, confirm that you can visit your website when you type your address with the special “https://” at the beginning. The extra “s” you see there means secure – and your browser expects the info it sends & receives to be secure.
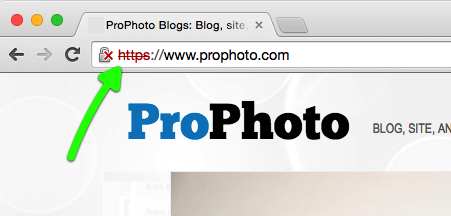
Even if your site doesn’t display correctly (missing images, strange formatting, etc.) you simply want to confirm that you do not get a browser warning that the site has no certificate set up. It’s even okay if the browser doesn’t load the page as fully secure, as seen in this example:

it’s okay if your site comes up as ‘insecure’ at this stage – you’ll fix that next…
If your browser forces you back to the http:// web address for your site, a redirect might be setup on your server which must be disabled before you proceed. Contact your hosting company for help if you cannot visit your site with the https:// address.
Step 3: Set WordPress to use the HTTPS address
Okay, you’re really sure that you aren’t being redirected to another address in Step 2 above? Good, let’s proceed.
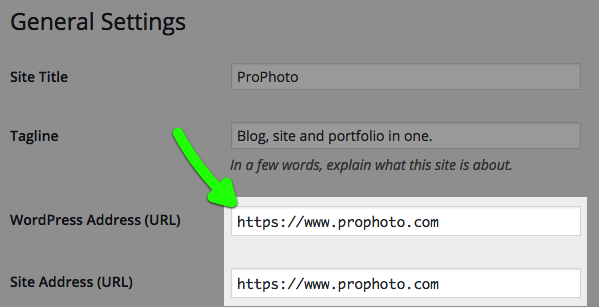
This step is easy – you’ll simply edit the address in WordPress by adding the “s” to both address boxes in your WordPress setup, here: “Settings” > “General”

change the ‘http’ in BOTH address boxes to use ‘https’ instead
NOTE: you may notice a red warning about changing your site address, which you can ignore
After changing your WordPress address, you will login at the new address with https:// at the beginning of your normal login address. For example, if you used to login at:
http://www.mydomain.com/wp-admin/
you will begin logging in here in the future:
https://www.mydomain.com/wp-admin/
It’s a good idea to update any bookmarks in your computer’s web browser, if you’ve stored any.
Step 4: Create a redirect from HTTP to HTTPS
You might think steps 1-3 are all there is to do, since your site now works from the https:// address, but there is an important clean-up step: setting up a redirect for your old http:// address.
Much like setting up forwarding for your postal mail when you move to a new home, you want all traffic to head to the new secure website address. (this also updates search engines like Google automatically, so search results start using the new link addresses)
We recommend using a WordPress plugin called Really Simple SSL to take care of this for you. Once installed and activated, it should take care of making sure that all URL requests to http end up at https.
Step 5: Update Google Analytics, Search Console, etc.
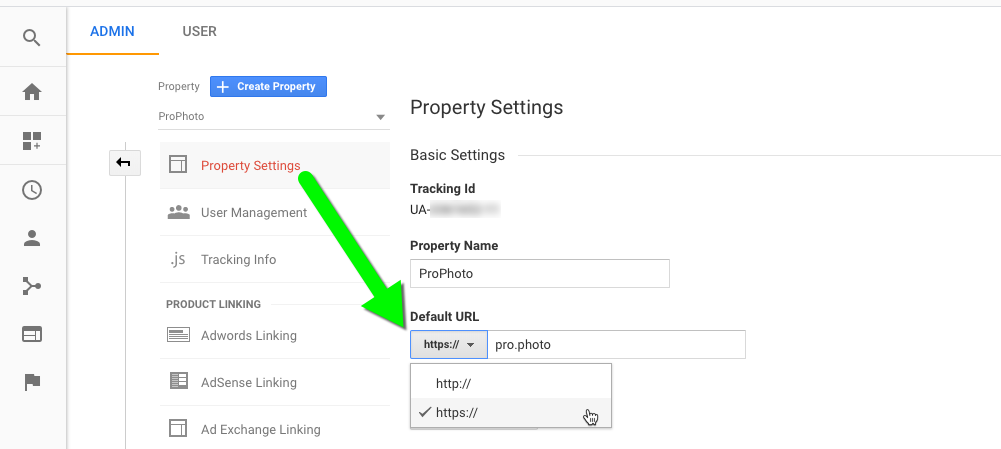
If you happen to use Google Analytics, you will need to edit your “property settings” to refer to your website under the new https:// address.
In fact, there is a nifty dropdown which makes it easy to switch:

Update Google Analytics to refer to your site under the new address
Also, if you use Google Search Console, you will need to create a new property that is separate from your original http:// address. This means you will have two properties, like this:
http://mydomain.com
https://mydomain.com
Google manages each separately, so an address change is not supported. Create a new property for the secure address and you’ll be all set.
If you also use other website tracking services or integrations, check with their recommendations to help accommodate the change of your site address.
Troubleshooting
I setup everything, but now my masthead/gallery/contact form/other ProPhoto feature isn’t working normally
Try saving a small change to any part of your ProPhoto design. This forces ProPhoto to clear its cache and recreate some static files it uses to display your site.
Also, try refreshing your site in your browser or clear your browser cache to make sure everything is loading live from your web server and not from your computer’s cache.
If you’re still having trouble with a ProPhoto feature not working normally, please contact us.
My site has a certificate setup, and I’ve changed my address in WordPress …
why don’t I see a secure padlock in my browser address bar?
There are lots of reasons you might not have a secure site after following the steps above.
First, make sure you’ve actually setup the redirect on your server in the steps above.
Second, try disabling WordPress plugins – they may be trying to load content from other locations on the web with an insecure address.
If you still can’t locate the issue, this site may help you narrow down the parts of your site that are being loaded insecurely:
A plugin I use in WordPress stopped working after I changed to https
Unfortunately, we aren’t able to provide help with plugins, so you may need to contact the developer of the plugin directly for help. As a quick test, you can temporarily activate another theme in WordPress to see if the plugin only has trouble when ProPhoto is active.
Contact us if your site only has a problem while ProPhoto is the active theme.
I made a mistake somewhere and I’m unable to login to WordPress and/or can’t view my site
We might not be able to fix the problem if it’s related to your redirect, but if you contact us we may be able to simply revert your WordPress site to the original http:// address so you can login.
Contact us for help.
I’m having issues with URLs redirecting correctly from http to https.
If you tried using the plugin we recommended above, but it doesn’t seem to be working, you can try setting up the redirect manually. Before proceeding with this step, you should be able to visit your site at the https:// version of your address, and you should be able to login to WordPress at the new https:// address. If you can’t do both of these things, do not proceed – reach your hosting company for support.
Different web hosting companies provide different ways to setup these ‘redirects’, so check with your hosting account help or reach tech support at your host if you can’t do this.
Here’s an example of the “Redirects” item in a Bluehost cPanel:
find your ‘redirects’ area in your hosting account, usually in a ‘domains’ area
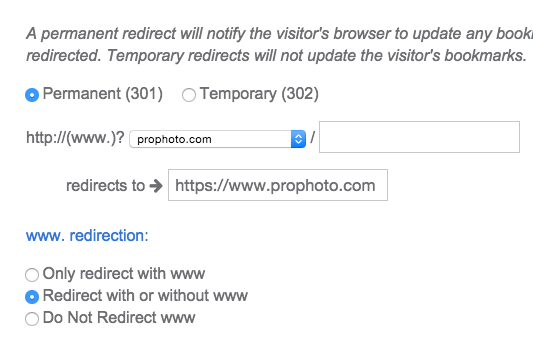
After entering this area of a hosting account, you should see an option to redirect your normal address to another address – simply choose a Permanent (301) redirect type, and fill in the “https://” version of your address. Also, pick the option for with or without www if you have the choice, seen here:

setup a 301 redirect to your https address
If your host gives you an option for a wildcard redirect, you should select this option, too – this way, any page your visitors are trying to view will still come up using the new address.

some hosts provide ‘wildcard’ redirecting – usually a good idea to select
If your host provides an option called forward with masking or called stealth forwarding you should not use this option – they can cause trouble with WordPress and ProPhoto, including problems with mobile layout, image galleries, and your contact form.
Test your redirect by trying to visit your site using the normal http:// version. Your browser address bar should automatically switch to the https:// address and the site should load normally. If the page loads at the old http:// address, there’s a problem and you’ll need to get help with your redirect.
If your host does not provide any redirect options in the control panel, you may be able to use a text editor to add some code to the .htaccess file on your web server, right where WordPress is installed.
You might try adding this code to the file, above any mention of WordPress stuff:
RewriteEngine On
RewriteCond %{HTTPS} off
RewriteRule (.*) https://%{HTTP_HOST}%{REQUEST_URI} [R=301,L]
Be aware that this changes how your web server behaves for all domains used with your file system and should only be attempted if you are confident you can remove the code in the event of a problem.


