To create a post, login to WordPress and click the “Posts > Add new” item in your admin screen – you should find it to the left, under the “Dashboard” option.
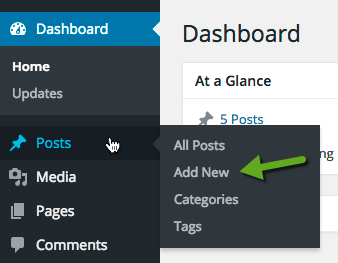
Once you click to create a new post, you’ll see the editor for posts, where you can type the text, insert images, and more.
You’ll see a really similar editor for blog posts as you do for web pages in WordPress, so let’s get acquainted to the main panels and features.
Use the Block editor
The “Gutenberg” block editor was released with WordPress version 5. WordPress has a live demo where you can see and play around with it. See the below video for a tour. For a deeper dive into something written I recommend this Gutenberg tutorial. At some point, fire up a new post and begin playing!
Keep reading for more info!
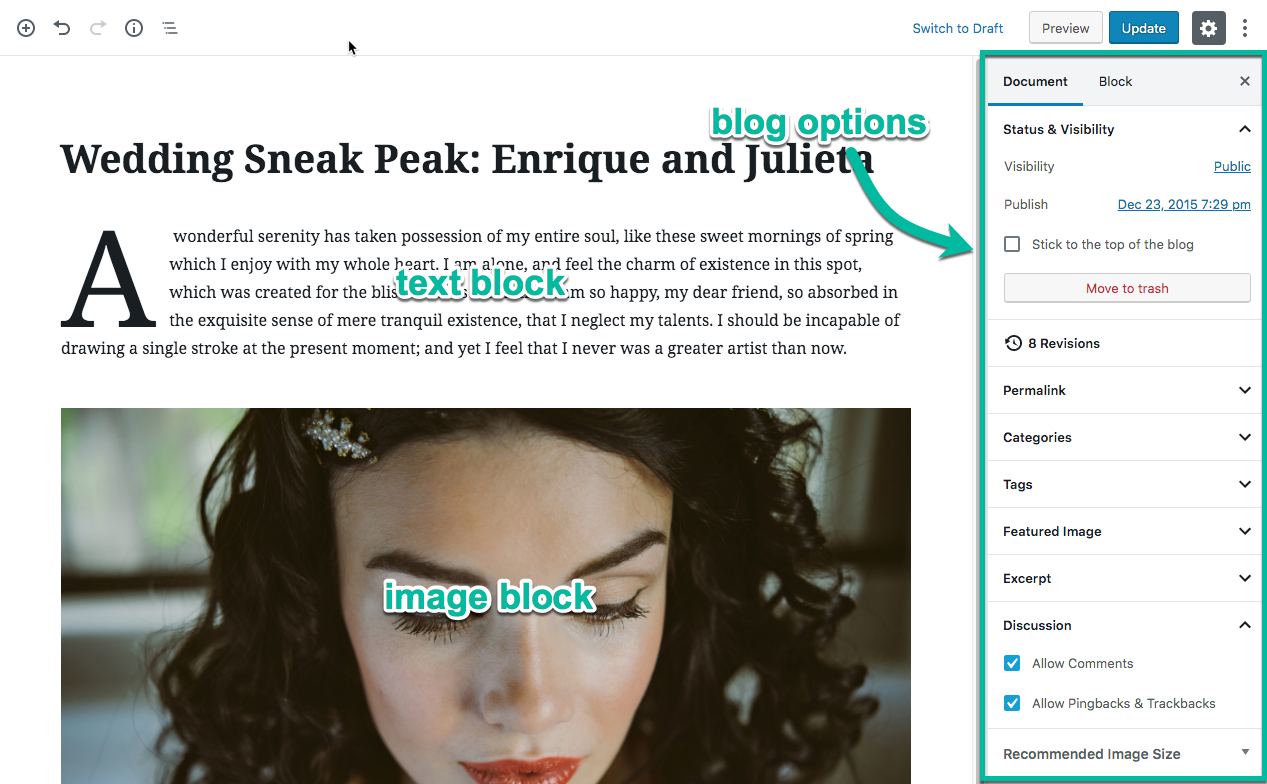
Each post contains a title, some content, and a publish date & time. You can also create categories to organize your posts, such as weddings or photography tips and you can even create nested levels of categories.
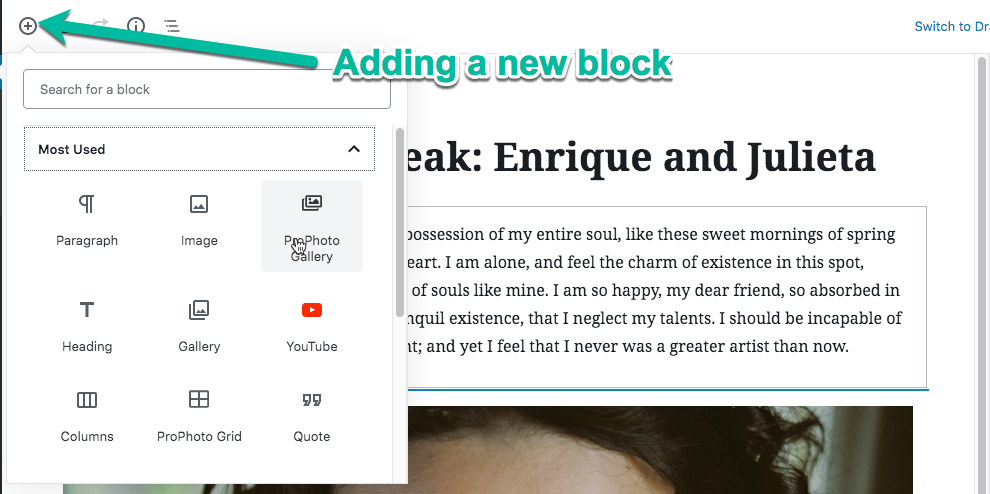
The content in the post is made up of blocks of different types. Each block has their own option that will appear in the right sidebar when you are editing that particular block. Creating a post consists of adding blocks of different types (paragraph, heading, image, gallery, grid, video, etc) and arranging them how you like.
As you work, WordPress will, by default, save a draft of your work so you can restore it if you close your browser or your computer shuts down. But it’s a good idea to occasionally save your changes as a draft – especially before you stop working for a while.
Publish a post
When you are done editing your post, simply click to publish the post. As soon as you publish, it will become visible to the world, and anyone who visits your site will see the new post on your blog page. You can even set a date to publish your post some time in the future – when that time comes, the post will become public automatically!
Changing status and visibility
Each post you create can be setup to be in-process, visible to the world, password-protected, and other options.
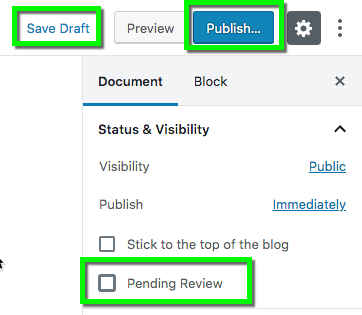
Status can be changed between Draft, Pending Review, and Published – here is an explanation of each:
- Draft is a work-in-progress; your post can’t be viewed unless you are logged into WordPress and editing the post.
- Pending Review is a finished post, but not viewable unless you are logged into WordPress and editing the post. This is most useful when multiple people work on one blog, and someone must approve a post before it can be published.
- Published is a finished post that is released and visible* to the world on the blog.
You may change the status of a post any time.
Visibility can be changed between Public, Password-protected, and Private – here is an explanation of each:
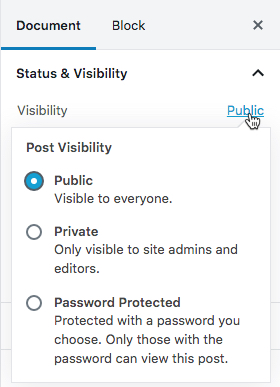
- Public can be viewed by anyone visiting the blog.
- Password-protected is listed on the blog, but cannot be viewed without entering the correct password.
- Private can not be viewed by the public, and is not listed on the blog – you must be logged into WordPress with an administrator account to view the content on the blog or find it using search.
You may change the visibility of a post any time.
Sticky posts
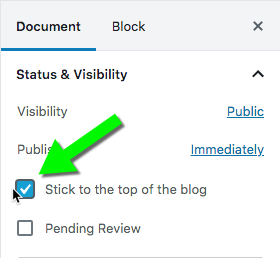
Blog posts are listed in reverse-chronological order, so the newest posts are shown at the top. But sometimes a post should appear first on the blog, even if it’s a little older than others. You may set a published post to appear sticky so it stays at the top.
You might choose to make a post sticky when you’re posting an announcement that is important to see for a limited time at the top of your blog. Typically, a post will only be stick for a short while. If you need to post something that should be persistent, consider creating WordPress web pages instead. You can link to web pages in a prominent part of your site design by using links & menus (P6 / P7), grids (P6 / P7) or other tools near the top of all or some parts of your site.
Organize and display posts
If you need greater control over your blog posts, you can organize posts with categories, you can label posts with tags, or you can use WordPress plugins to change the normal behavior of posts on your site.
And if your setup shows posts on the front of your site, but you want posts to appear on a separate page, you can setup a static front page (P6 / P7) so your blog posts appear on a different page with a separate URL path.
Use the classic editor

Each post contains a title, some content, and a publish date & time. You can also create categories to organize your posts, such as weddings or photography tips and you can even create nested levels of categories.
As you work, WordPress will, by default, save a draft of your work so you can restore it if you close your browser or your computer shuts down. But it’s a good idea to occasionally save your changes as a draft – especially before you stop working for a while.
Publish a post
When you are done editing your post, simply click to publish the post. As soon as you publish, it will become visible to the world, and anyone who visits your site will see the new post on your blog page. You can even set a date to publish your post some time in the future – when that time comes, the post will become public automatically!
Changing status and visibility
Each post you create can be setup to be in-process, visible to the world, password-protected, and other options.
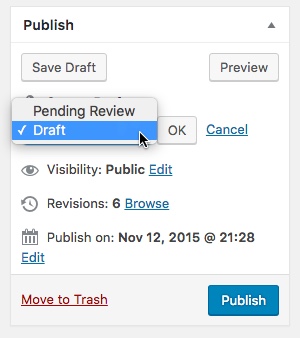
Status can be changed between Draft, Pending Review, and Published – here is an explanation of each:
- Draft is a work-in-progress; your post can’t be viewed unless you are logged into WordPress and editing the post.
- Pending Review is a finished post, but not viewable unless you are logged into WordPress and editing the post. This is most useful when multiple people work on one blog, and someone must approve a post before it can be published.
- Published is a finished post that is released and visible* to the world on the blog.
You may change the status of a post any time.
Visibility can be changed between Public, Password-protected, and Private – here is an explanation of each:
- Public can be viewed by anyone visiting the blog.
- Password-protected is listed on the blog, but cannot be viewed without entering the correct password.
- Private can not be viewed by the public, and is not listed on the blog – you must be logged into WordPress with an administrator account to view the content on the blog or find it using search.
You may change the visibility of a post any time.
Sticky posts
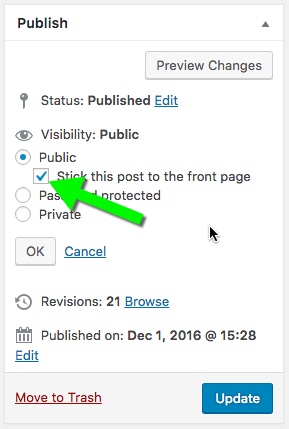
Blog posts are listed in reverse-chronological order, so the newest posts are shown at the top. But sometimes a post should appear first on the blog, even if it’s a little older than others. You may set a published post to appear sticky so it stays at the top.
You might choose to make a post sticky when you’re posting an announcement that is important to see for a limited time at the top of your blog. Typically, a post will only be stick for a short while. If you need to post something that should be persistent, consider creating WordPress web pages instead. You can link to web pages in a prominent part of your site design by using links & menus (P6 / P7), grids (P6 / P7) or other tools near the top of all or some parts of your site.
Organize and display posts
If you need greater control over your blog posts, you can organize posts with categories, you can label posts with tags, or you can use WordPress plugins to change the normal behavior of posts on your site.
And if your setup shows posts on the front of your site, but you want posts to appear on a separate page, you can setup a static front page (P6 / P7) so your blog posts appear on a different page with a separate URL path.


