
 Photographers tend to have websites with lots of high-resolution images. But loading a full size image when it is too large to fit the browser causes a site to load more slowly than necessary. To improve the speed and performance of your site, ProPhoto includes an automatic image downsizing feature.
How it Works
When you upload an image – whether in a post, page, photo gallery or graphics widget – WordPress creates a few common downsize copies, such as large, medium, and thumbnail. But these may not be ideal for certain screens viewing the image.
ProPhoto smartly creates and loads the appropriate image size needed for the visitor’s screen – even as visitors resize their browser. As needed, ProPhoto creates downsized copies at widths of 480px, 768px, 992px, 1200px, 1600px and downloads them to the visitor’s browser. After this has been done once, anyone viewing the site will notice much faster loading speed for images.
As great as automatic downsizing is, it is still important for you to prepare your images for the web for faster uploading speed, to consume less server storage, and to speed up this automatic downsizing process.
Downsizing Max-Size Threshold
ProPhoto will limit the downsizing process to prevent errors on web servers with low memory resources. This means that images which are extremely high-resolution will not be processed automatically.
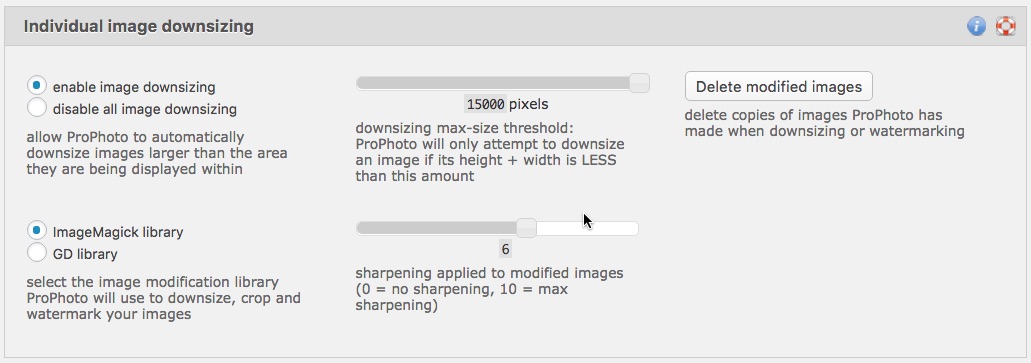
You can adjust this limit in the “ProPhoto > Settings > Site Settings > Misc > Image downsizing” screen, seen here:

This setting determines the maximum image size (width + height, in pixels) that ProPhoto will automatically downsize. Above this threshold, ProPhoto will not create a downsized image, and instead the full size image will be loaded. (much slower)
Typically, this setting can be increased as high as possible, but may need to be reduced if your server creates ‘out of memory’ errors or other problems.
Selecting an Image Downsizing Library
Choose your image downsizing library in the “ProPhoto > Settings > Site Settings > Misc > Image downsizing” screen. If you are given a choice, choose the ImageMagick library – it is faster than the GD library, and also creates crisper downsized photos by applying post-sharpening you can adjust, seen here:

If you do not see the option to use ImageMagick, you will need to ask your web hosting company to help you turn this feature on for your web server. For more information, see our ImageMagick support guide.


