What you need
Expert InstallationBefore you can install the WordPress platform to create a website or blog, you’ll need to own your own domain name have it connected to a website hosting service. (not WordPress.com) If you don’t have a hosting account yet, please start by visiting our Hosting & domain page for guidance.
Or, skip the entire WordPress installation process by using our recommended host which comes with WordPress pre-installed!
When you can login to your hosting account, come back here and work through the steps.
Wait, I already use WordPress!
If your site is through an account at WordPress.com, you will still need to create a self-hosted WordPress setup on a website hosting service. WordPress.com allows you to install your own plugins and themes with their expensive Business plan option, but it doesn’t run ProPhoto correctly. If you use WordPress.com for your blog, visit our Hosting & domain page for guidance. You can import WordPress.com content later, if you want.
And if you already have a self-hosted WordPress site, or if you have a new managed WordPress hosting plan, you can skip all the steps on this page. ProPhoto can be installed in a special test drive mode to work on your design privately before applying it for the world to see. If this is you, skip WordPress installation seen below, and head right over to our Install ProPhoto guide.
Locate the WordPress installer
To begin, you’ll need to login to manage your hosting account, sometimes found in a cPanel or control panel area of your account. Once you’ve logged in, look for tools to help you install WordPress, which might appear in areas titled:
- install or manage applications
- install or manage software
- install WordPress
- website builders
The icon itself might show the WordPress logo or might reference an installer. Some common installers are Mojo Marketplace, Fantastico, Softaculous, and Quick Install. The installer tool might also say something generic like “install scripts.”

A sampling if control panel icons for starting a WordPress installer
Once you’ve found the WordPress installer tool, go to step 3 to find some tips and host-specific instructions.
Help, I can’t find a WordPress installer tool!
Your web host should offer a WordPress Installer tool, so if you cannot find the installer, search the help for your host and search for Install WordPress. Contact your host tech support if you can’t locate the installer.
In the rare case that your host does not have an installer tool for WordPress, you can install it manually. Use the guide from WordPress or this helpful one from wpbeginner.com. Or, purchase our expert installation option and our team can setup WordPress and any products you purchased from our site so you can simply login and get started.
Run the WordPress installer
Different installer tools have different steps and choices as you go, so we provide or link to instructions for some popular hosts so you can get WordPress installed for your situation. Don’t worry if you don’t see your host in the list blow. Most WordPress installers are easy to use and most hosts have their own guides. If not, they’ll be happy to point you in the right direction.
Items to consider before installation
Username & password
Most installers ask you to choose a username & password for your WordPress system. We recommend using your email address instead of any default admin username, so fill in a username if given the chance. You will not be able to easily change your username in the future, but you can always create new user profiles to replace it in the future.
Passwords should be strong. This is one of your best defenses against hacks. Easy to remember is nice, but having it be strong is more important. WordPress allows you to reset your password any time in your “Users > Your profile” screen in WordPress. Or, if you are locked out at the login screen, you can view our Change user password guide.
Install location & temporary addresses
Every installer will ask which domain name connected to your account you want to use for WordPress. You will also also be presented with the option to install in a subdirectory of your choice.  For example, you might choose to install at petespets.com and then in a folder or subdirectory called “blog.” This will result in WordPress being installed at a url of http://petespets.com/blog
Set up WordPress before moving your domain name to your host
If you want to work on your new website before pointing your domain name to your new hosting (perhaps you have an existing site there), you have some options. Which option is best depends on what your host offers and what your needs are.
- Install at a temporary url provided by the host. A good number of (especially cPanel) hosts offer a temporary url based on your server IP address. Contact your host to see if they offer this, or a similar, option. When you are ready to make the switch you point and/or transfer your domain name to your host and change the urls to your permanent address in the WordPress settings area.
- You can simply use a new or different domain name or sub-domain while you design your site. Your host should be able to help you set this up. When you are ready you can change to your permanent domain name.
Host-specific WordPress installation instructions
After installation is complete, you should be able to login to WordPress in the next step.
123-reg
123-reg has an automatic WordPress installer for most of their hosting types. This makes it easy to install WordPress with a few clicks in your hosting control panel. The links below point to 123-reg guides for installing WordPress on three of their hosting types. If you are not sure what hosting type you have you’ll want to contact 123-reg directly.
- Installing WordPress on linux shared hosting – This is the most common hosting for people to have, as it is generally the cheapest.
- Installing WordPress on a virtual private server (VPS) running cPanel.
- Installing WordPress on Windows hosting running Plesk. Windows hosting is not recommended for ProPhoto or WordPress but we include this link for those that might be using Windows hosting for another site for valid reasons.
1and1
Most people using 1and1 for WordPress will be on their standard, linux based shared hosting plan. For this they have an automatic installer for WordPress in their “Click and Build” web applications area. In order to have the control you need to install and use a premium theme like ProPhoto you will want to installed in “free mode” as opposed to “safe mode.” Log into your 1and1 hosting control panel and follow their simple instructions for installing WordPress. If necessary, 1and1 has “Stage for WordPress” tool you can use to work privately on a separate setup.
If, for some reason you are not presented with a “free mode” option in the Click and Build installer then you’ll need to manually install WordPress and set up your database. You can follow their tutorial for doing this or you can click the button below that says “need manual WordPress installation instructions” to follow our own manual WordPress installation tutorial.
1and1 does also offer a managed WordPress hosting product. We have not tested this, but generally WordPress comes pre-installed; you would just need to log in to your control panel and create your user account for the first time before you can log in.
BigFolio
Bigfolio’s documentation says that they will install WordPress for their users, so you will want to contact them about getting WordPress installed. They may ask about installing a WordPress theme for you as well, but you can just tell them that you have purchased and will be installing ProPhoto instead.
Bludomain
Bludomain sites use the Fantastico installer. Log in to your control panel, find that icon and follow the prompts.
Bluehost
Bluehost has a really simple installation process. Find the “Install WordPress” or “One-Click Installs” icon from the “website” area of your cPanel. From here you will use Mojo Marketplace to install WordPress. The prompts should be easy to follow.![]()
- View the Bluehost WordPress install guide
- View our own ProPhoto WordPress install video for Bluehost and other sites that use Mojo Marketplace.
Creative Motion Design (CMD)
CMD does support self-hosted WordPress installations. According to their staff, every CMD site comes with WordPress already installed in a directory called “blog.” Within the hosting dashboard there is a button titled “blog,” which, after it has been pressed, will take you to the login panel for your WordPress. The first time you access this screen you can select your username and password. The Email address you have on file with CMD can be used as the contact Email to retrieve a password reset request (this can be activated at the login screen) if you ever need to do that.
Dreamhost
If Dreamhost is your host you likely have either their standard shared hosting or their “DreamPress” WordPress managed hosting. Their standard shared using has a simple “One-Click Installer” tool. Like most managed hosting types, with DreamPress hosting, WordPress is automatically setup for you when you first set up your account.
Fatcow
Fatcow shared hosting accounts will used Mojo Marketplace to install WordPress. Below are the steps.
- Log in to your control panel
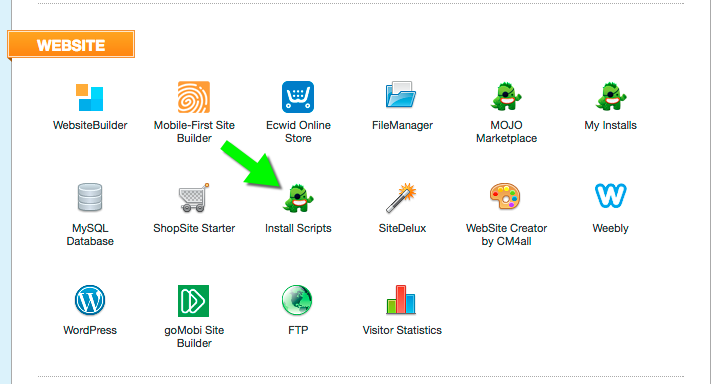
- In the Website area locate the “Install Scripts” icon and click.
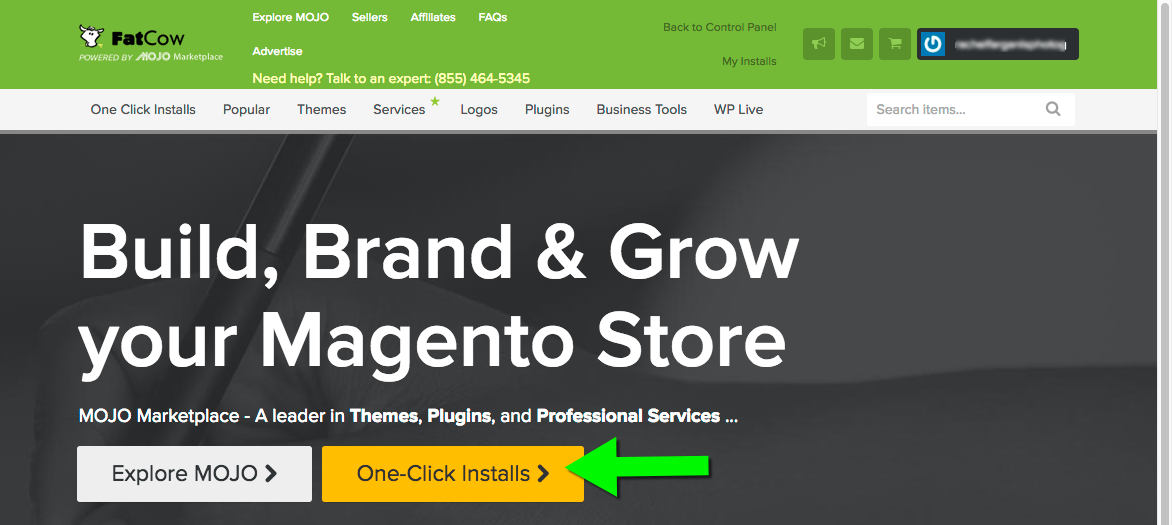
- You will land in the Mojo Marketplace. Click “One-Click Installs.”
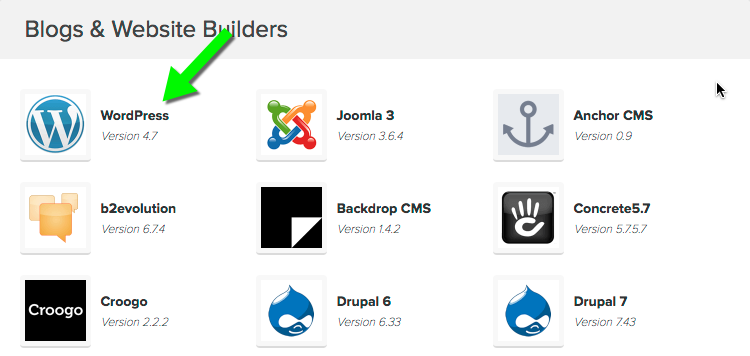
- Click the WordPress icon.
- In the WordPress installer click “Install.”

- Choose the domain name at which you want WordPress. Add a subdirectory if you want if necessary. Leave the subdirectory box blank if installing at the root of your domain name. Unless you know you want them installed, uncheck the plugin boxes.
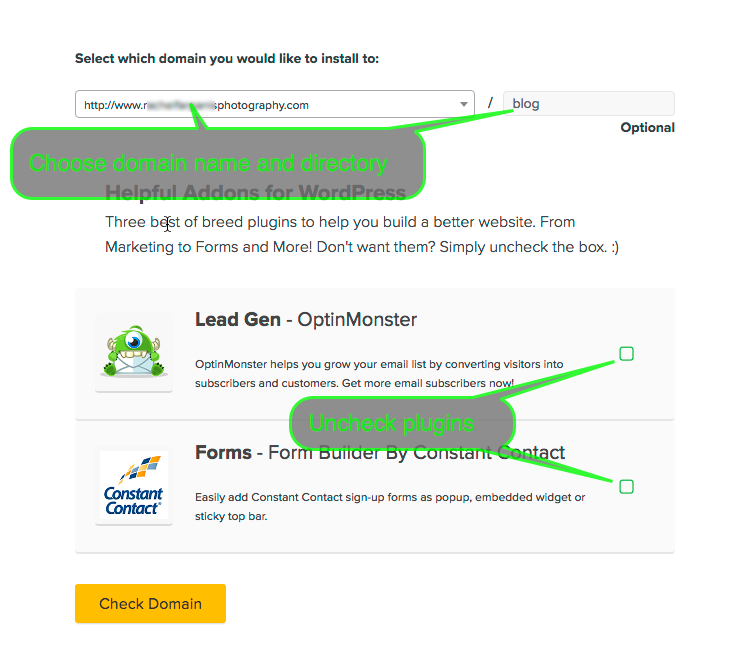
- Click “Check domain.” Mojo will make sure it is ok to install here.

- Expand the advanced options area and enter a site title, admin username/email and a password. Click “Install Now” to begin the actual installation on your server.
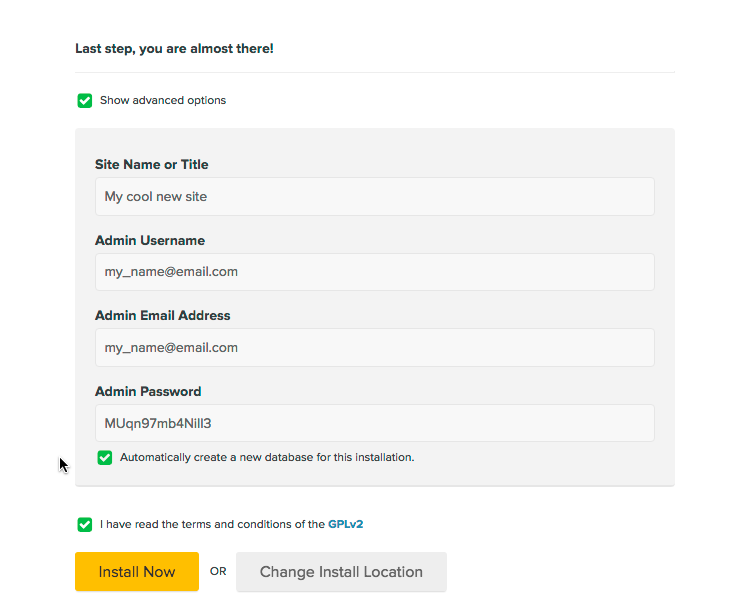
- You’ll see a banner and progress bar at the top of your site showing the installation process. When it’s finished click “View Credentials.”


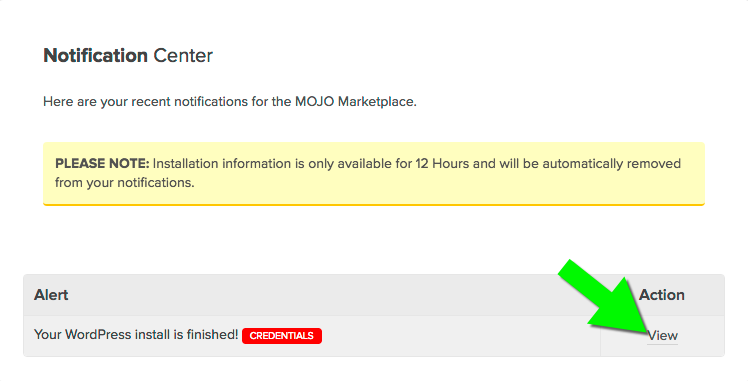
- In the notification area click “view.”
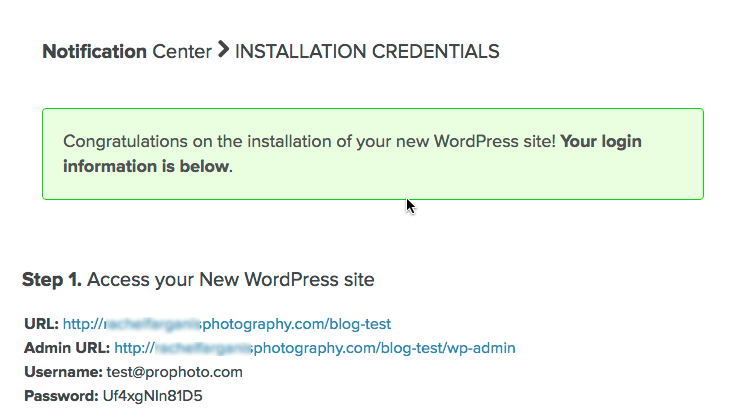
- Here you will see your site url, the admin login url, your username and password. Save all this information. Then log in to your site and install ProPhoto.
Godaddy
GoDaddy has a few different types of hosting. Most people will use their cPanel hosting which comes with an installer called “Installatron.” A fair number of folks have their WordPress managed hosting, as well. A few people might be using their Plesk hosting but we don’t recommend that for WordPress. Below are some helpful installation links.
cPanel hosting (linux-based)
Managed WordPress hosting
- WordPress comes pre-installed on this hosting type. You should be able to log in to your hosting account and follow their prompts to set up WordPress. Contact them directly with questions.
Legacy control panel
Very view people still have GoDaddy’s old linux hosting but some who been a long time customer and have not upgraded to cPanel still do. If you have recently purchased hosting with GoDaddy these guides are not for you.
Plesk hosting (windows-based)
- GoDaddy WordPress install guide – Windows hosting is not recommended for ProPhoto or WordPress but we include this link for those that might be using Windows hosting for another site for valid reasons
Hostgator
Hostgator has a handy WordPress installer called “QuickInstall.”
- View Hostgator WordPress Install guide with video
- View ProPhoto WordPress Install video for newer hosting
- View ProPhoto WordPress Install video for older hosting. If your Quick Install options look different you may still be on one of their older hosting packages. If that’s the case, this video should be accurate.
Hostmonster
The hostmonster cPanel and options look exactly like Bluehost and so the install guides are really the same.
HostPapa
Hostpapa uses “Softaculous” to install WordPress automatically.
iPage
iPage has an installer for WordPress called “Mojo Marketplace” which makes it easy to install WordPress. For instructions, see iPage’s WordPress installation instructions on their site.
JustHost
JustHost uses Mojo Marketplace for their WordPress installations. In the website section of the cPanel look for an “Install WordPress” icon and follow the prompts.
Media Temple
Media Temple offers three types of hosting products. The process you use to set up WordPress depends on which type you have. To verify your hosting type, check with their support.
- If you have their Grid Shared Hosting (which is the most common) then follow this guide for installing WordPress using the “1-Click Applications Tool.”
- For DV / VPS hosting use their cPanel instructions to install WordPress.
- If you have their managed WordPress hosting product then WordPress comes pre-installed at the root of your server. After your domain name is connected to your account all you need to do is create a new site in your account center. See their instructions for just how to do that
Network Solutions
Network Solutions standard shared hosting has a one-click installer called “Open Source” that can be used to install WordPress. To locate this installer in your hosting admin area see their tutorial. If you have questions about it, call the Network Solutions technical support phone number have them walk you through the installation process while you’ve got them on the phone.
If have WordPress Blog Hosting with them then WordPress will be automatically installed when you set up your account.
One.com
One.com has a simple auto installer for WordPress. They have a step by step guide on their site for how to use their installer.
portfoliositez
Portfoliositez hosting using the “Fantastico” script installer for quickly installing WordPress.
Site5
Site5 offers a convenient auto installer for WordPress that only requires a few clicks in your hosting control panel.
- SiteAdmin (most common)– if your shared webhosting uses “SiteAdmin” for the control panel then see their guide for installing WordPress with the Web Apps installer.
- If you have a VPS server or another hosting product that uses cPanel then follow their guide for installing WordPress with Softaculous. For further help with Softaculous see our generic softaculous video below.
westhost
Westhost cPanel hosting accounts use “Softaculous” for installing WordPress. Locate the Softaculous icon in your cPanel. WordPress Hosting accounts will set up WordPress for you automatically when you initially set up your account. The linked guides below are for folks with cPanel hosting.
Yahoo
Yahoo is not one of our recommended web-hosts because of problems we have had with them in the past. However, they do advertise the ability to install WordPress on their servers. We don’t have a lot of experience with their services, but you can try following their simple WordPress installation instructions. WordPress has some helpful tips for the installation process if you run into problems. It looks like they recommend a manual installation instead of using the installer. Yahoo should be able to verify if that is still necessary.
Login & configure options
At this point, you should have installed WordPress on your web server, and the installer may have even signed you in already. Most installers will email your setup information to you, including the address where you login, and your username. But you can Login to WordPress by adding wp-admin to the end of your setup address. For example, if I installed WordPress at my main address for petespets.com, my login would be:
http://petespets.com/wp-admin/
Bookmark your login address in your browser, if you like. You’ll always sign in at the same address.
Setup a few WordPress options (recommended)
We recommend checking these WordPress options once you have logged in:
- “Users > Your profile > [name info]”
In this area, you can edit the first name, last name, and displayed name of your profile. Personalize as needed. - “Settings > General > Site Title”
This text is the name of your business/site, and is used automatically for search engine SEO title tags. Fill in a concise name for your business/site, such as “Pete’s Pictures Photography” in this box. - “Settings > General > Tagline”
This text describes your business/site, and is used automatically as search engine SEO description text in some cases. It should be less than 160 characters, and briefly explain what your business/site is all about. It’s not a bad idea to mention your primary location in this text, such as “Professional pet and dog photography in Seattle, WA and surrounding areas” in this box. - “Settings > General > Timezone”
For accurate time, we recommend selecting your primary timezone in this dropdown. It’s normally easiest to pick the closest city. - “Settings > Reading > Blog pages show at most # posts”
Choose the number of blog posts that should be shown on your blog page types. (main blog pages, category pages, date archive pages, etc.) This number may be overridden by other settings if you display posts in an excerpt grid format. - “Settings > Permalinks > Common Settings”
Instead of the typical Plain permalink option, we find that most people use the Post name option in this screen, or one of the other two options above it which show the post name.
Setup a few plugins (optional)
There are some tools you will find very helpful with any WordPress site, including:
- Akismet (anti-spam for comments)
Running a website means you will need to Manage comments when they are enabled. WordPress provides options in the “Settings > Discussion” area to setup rules for blocking spam, but we’ve found that automatic tools like Akismet and others are easier to use. - WordPress Database Backup
This is just one of many ways to keep a current backup of your database, which is a critical part of your site’s backup plan. With this plugin, arrange to have your database emailed to you automatically.
Hey, my host isn’t listed!
Please check our Compatible Hosting Companies page or contact your hosting company directly to verify that WordPress can be installed on your hosting plan.
Install ProPhoto
You’ve gotten WordPress installed! Now it’s time to load the most powerful and flexible theme available. Follow the installation instructions.
If you have also purchased a ProPhoto design to install, you will install the design after ProPhoto is installed.


